

EleksTube IPS Clock Setup Guide
Setup EleksTube IPS Clock in a few easy steps
Before starting:
First of all, thank you for choosing the EleksTube IPS clock produced by EleksMaker. No matter where you purchase it, when performing the following configuration, please ensure that the product is purchased through our official certified channels to avoid updating the firmware to the device, causing a black screen and other failures.
EleksTube IPS clocks ship with the stable Ver3.10 firmware, which this guide is written for. A newer browser-based Web UI firmware is also available as an optional upgrade — see the yellow notice above.
A few things to check - before starting:
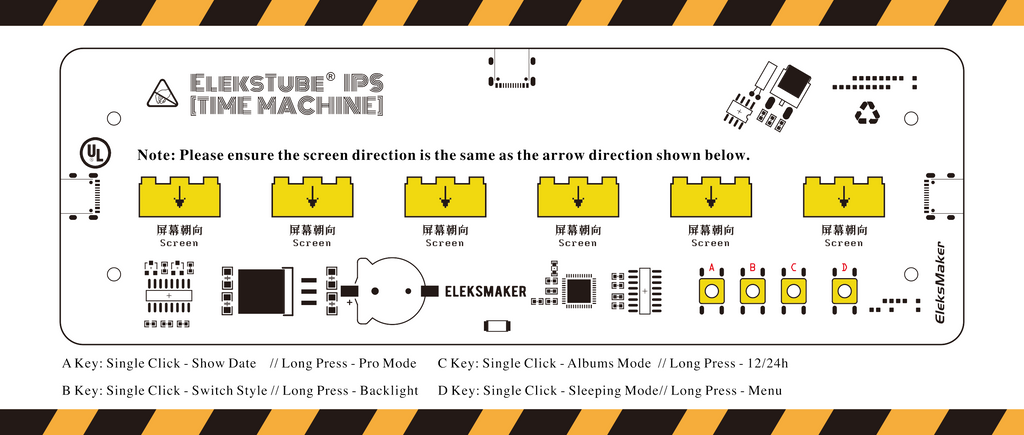
- Follow the instructions to properly install the screen onto the clock base. When installing, pay attention to the front of the screen facing the buttons.
- When installing the clock screen, be careful not to press the FPC cable on the back of the screen too hard.
1. Download the EleksTube IPS PC client program
Download the PC client For EleksTube IPS Clock
If you are on Mac OSX, please do not download. We currently only provide PC client programs, and Mac platform clients are under development.
Wi-Fi and time synchronization can now be configured via the Web Bluetooth API elekstube.app
2. Plug the clock into the computer and start the client

If the connection status icon does not turn green, please confirm:
1. Use the USB cable that came with the device to connect the clock to your computer’s native USB-A port;
2. Disconnect the clock from the computer, click the first icon on the left in the upper right corner of the client program, reinstall the CH340 driver and start the client again and connect the clock.
3. If the PC client cannot be started normally, please place the program directory in the root directory of the system and run it again, such as C:/.
3. Configure Wi-Fi time auto-sync and correct time zone for clock

There are following things to note
1. Only supports 2.4G Wi-Fi hotspots;
4. Check the status of the clock

You can check the version number and Wi-Fi connection status of the clock on the Device INFO interface. If it is empty, it means the clock is not connected correctly.
5. Upload a custom image to the clock


Custom pictures support two modes: watch face and photo album, and you can set them separately for the clock.
1. Album mode supports uploading 6 custom pictures.
2. Clock mode requires the submission of 10 alternative pictures corresponding to numbers 0-9.
6. Up to 30+ built-in dial styles for you to choose from

Tip: You can select up to 4 sets of built-in dials at a time
7. Clock menu mode (without connecting to computer or Wi-Fi)


- Long press the button on the far right side of the clock to enter the menu.
- Selectable built-in clock face style.
- Turn on and off the NTP network time synchronization function (Wi-Fi needs to be configured in advance through the PC client).
- Time display mode 24/12.
- Time zone settings.
- RGB backlight switch.
The above is an introduction to clock usage under Ver3.10 firmware. If you have any questions, you can contact us for support at any time.
At the same time, we are also developing new firmware and releasing it to the official website after completing testing. If you would like to be notified as soon as possible, please subscribe to our email notifications.
FAQ
Q: I’m unable to upload custom images or synchronize built-in clock faces to my EleksTube IPS. How can I fix this issue?
A: If you’re having trouble uploading custom images or synchronizing clock faces from the Market tab using the EleksTube IPS PC Client, follow these steps to resolve the issue:
1. Navigate to the file directory where the EleksTube IPS PC Client is installed on your computer.
2. Locate the /data folder within the program’s directory.
3. Delete the /data folder.
4. Reopen the EleksTube IPS PC Client and try the following:
• Upload your custom images again.
• Synchronize built-in clock faces from the Market tab to your device.
This should resolve the issue. If the problem persists, ensure you are using the original data cable provided with your EleksTube IPS, as third-party cables may cause data transfer issues.
EleksTube_IPS_User_Manual_EN_JP_v1.0 (Download)
EleksTube IPS PC Client (Download)